

使用 Network Recycle Bin 启用映射网络驱动器上的回收站
wsgzao · wsgzao · 2018-04-20 11:02:48 +08:00 · 1686 次点击这是一个创建于 2196 天前的主题,其中的信息可能已经有所发展或是发生改变。
前言
在内网环境中我们经常会使用 NAS 或者 Samba 在 Windows 中映射网络驱动器,方便局域网用户实时共享交换数据。但当存储在网络或映射网络上的任何文件被删除时,该文件将被永久删除。它不会去到本地计算机回收站,也不会去到服务器的回收站,我通过 google 在 mydigitallife 和 microsoft technet 中搜索到很多方法,但针对不同操作系统且涉及到域用户管理的复杂情况下,单纯的依赖注册表修改可能已经支撑不住需求的膨胀了。在所有的方法中使用 Network Recycle Bin 可以轻松解决映射网络驱动器上的回收站。
使用 Network Recycle Bin 为局域网巧设“回收站”
更新历史
2018 年 04 月 20 日 - 初稿
阅读原文 - https://wsgzao.github.io/post/network-recycle-bin/
扩展阅读
Network Recycle Bin Tool - http://www.networkrecyclebin.info/index.html
如何启用映射网络驱动器上的回收站
映射驱动器不过是将本地驱动器连接到另一台计算机上特别分配的共享目录或文件夹。 一旦驱动器被映射,您就可以访问共享资源,您可以像对待您的系统本地一样对待它。可以将多个计算机驱动器映射到共享资源,并利用此网络空间。
当存储在网络或映射网络上的任何文件被删除时,该文件将被永久删除。 它不会去到本地计算机回收站,也不会去到服务器的回收站。 为了避免将来出现这种数据丢失情况,您可以在映射的网络驱动器上启用回收站。 按照以下给出的步骤在映射的网络驱动器上启用回收站.
- 将网络驱动器映射到要使用的网络共享。 确保登录后重新连接驱动器
- 然后进入 C:> 用户 > 用户名
- 右键单击该位置的任何文件夹,然后单击 属性 > 位置选项卡
- 单击移动并浏览根驱动器(在步骤 1 中映射),然后点击选择文件夹
- 然后点击 好 并当对话框出现命中 是
- 只需在 PC 上为每个用户重复这些步骤
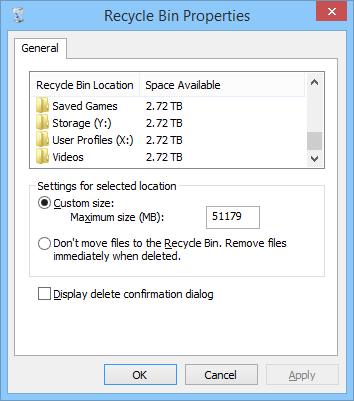
注意:要验证此过程是否正常工作,请右键单击回收站并转至属性,并检查网络驱动器是否在回收站的位置列中列出。
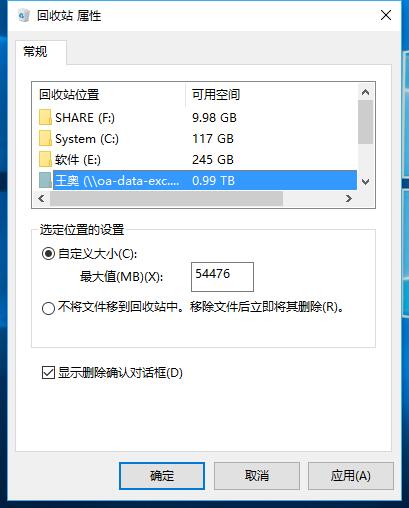

需要注意的事情
这仅适用于通过映射的网络驱动器而不是 UNC 路径访问的文件。 我们举一个例子:如果你已经将\server\share 映射到 E:并从这个 E:驱动器中删除了一些东西,那么它将会进入回收站。 但是,如果您浏览到\server\share 并擦除文件,它将被永久删除。
Enable Recycle Bin on mapped network drives
方案 1,通过重定向文件位置的方式我自己在 Windows 10 下测试可用,但 Windows 7 失败了
https://forums.mydigitallife.net/threads/tip-network-recycle-bin.16974/
You may have noticed that when you delete a file stored on a network location or mapped network drive that the file is permanently deleted. It does not go to the local computer's recycle bin and does not go to the server's recycle bin. I have discovered a work-around that extends recycle bin coverage to include mapped network drives. The solution is not 100% perfect, but works extremely well and does not rely on Shadow Copies or 3rd-party software.
Here's how:
- Map a network drive to the network share you want to use. Make sure that the drive is re-connected on logon. If you don't know how to do this, search Google.
- Browse to C:\users<user name>.
- Right-click on one of the folders in this location (I chose saved games) and click properties.
- Select the Location tab.
- Click Move, browse to to root of the drive you mapped in step 1, and click Select Folder.
- Click Ok and click yes in the dialogue box that appears.
- Repeat these same steps for all users on the computer.
方案 2,通过修改注册表搞定回收站问题,实际测试喜忧参半,通用性不高,不推荐
Just copy and paste the following into notepad and save it as "Network Recycling Bin - auto make registry file.bat"
echo off
REM ========== MAIN FUNCTION  ========================

Call :CreateREGfile
PAUSE
goto :eof


REM ========== SUB FUNCTIONS  ========================

:CreateREGfile
set /p RelativePath=Enter current mapped path of drive (e.g. X:\FileShare\D_Drive):
REM replace \ with \\ (for reg value its a requirement)
Set RelativePath=%RelativePath:\=\\%


set /p MaxBinSize_Dec=Enter max size (in mb) (eg 11gb=11000):
call :toHex %MaxBinSize_Dec% MaxBinSize_Hex


Set outputREG="Network Recycling Bin - %RelativePath:~0,1% Drive (%MaxBinSize_Dec%mb).reg"


call :MakeGUID_VBS NewGUID
REM echo My new GUID : %NewGUID%


echo Windows Registry Editor Version 5.00 > %outputREG%
echo [HKEY_LOCAL_MACHINE\SOFTWARE\Microsoft\Windows\CurrentVersion\Explorer\FolderDescriptions\%NewGUID%] >> %outputREG%
echo "RelativePath"="%RelativePath%" >> %outputREG%
echo "Category"=dword:00000004 >> %outputREG%
echo "Name"="NetworkDrive2RecyclingBin_%NewGUID:~1,5%" >> %outputREG%
      REM The "Name" value is required, but is not the name that will be shown if you right-click on the Recycle Bin and select properties. That will be autoset to the network drive name.
echo.>> %outputREG%
echo [HKEY_CURRENT_USER\Software\Microsoft\Windows\CurrentVersion\Explorer\BitBucket\KnownFolder\%NewGUID%]  >> %outputREG%
echo "MaxCapacity"=dword:%MaxBinSize_Hex% >> %outputREG%
echo "NukeOnDelete"=dword:00000000 >> %outputREG%
goto :eof


:MakeGUID_VBS
echo set obj = CreateObject("Scriptlet.TypeLib") > TEMP_generateGUID.vbs
echo WScript.Echo obj.GUID >> TEMP_generateGUID.vbs
FOR /F "usebackq tokens=*" %%rin (`CSCRIPT "TEMP_generateGUID.vbs"`)DO SET RESULT=%%r
set %1=%RESULT%

del TEMP_generateGUID.vbs
goto :eof


:toDec
:: todec hex dec -- convert a hexadecimal number to decimal
::             -- hex [in]      - hexadecimal number to convert
::             -- dec [out,opt] - variable to store the converted decimal number in
SETLOCAL
set /a dec=0x%~1
( ENDLOCAL & REM RETURN VALUES
    IF "%~2" NEQ "" (SET %~2=%dec%)ELSE ECHO.%dec%
)
EXIT /b


:toHex
:: eg  call :toHex dec hex -- convert a decimal number to hexadecimal, i.e. -20 to FFFFFFEC or 26 to 0000001A
::             -- dec [in]      - decimal number to convert
::             -- hex [out,opt] - variable to store the converted hexadecimal number in
::Thanks to 'dbenham' dostips forum users who inspired to improve this function
:$created 20091203 :$changed 20110330 :$categories Arithmetic,Encoding
:$source http://www.dostips.com
SETLOCAL ENABLEDELAYEDEXPANSION
set /a dec=%~1
set "hex="
set "map=0123456789ABCDEF"
for /L %%Nin (1,1,8)do (
    set /a "d=dec&15,dec>>=4"
    for %%Din (!d!)do set "hex=!map:~%%D,1!!hex!"
)
rem !!!! REMOVE LEADING ZEROS by activating the next line, e.g. will return 1A instead of 0000001A
rem for /f "tokens=* delims=0" %%A in ("%hex%") do set "hex=%%A"&if not defined hex set "hex=0"
( ENDLOCAL & REM RETURN VALUES
    IF "%~2" NEQ "" (SET %~2=%hex%)ELSE ECHO.%hex%
)
EXIT /b


:eof
Network Recycle Bin Tool 简介
本文主要使用 Network Recycle Bin Tool Personal Client Machine Edition 客户端
Server Edition
version 6.1.1.3
This version has been designed for the server usage. You should install it on the server to monitor shared folders. When network user will delete a shared file it will copy it to the "network recycle bin". You have not install any additional software on client machines.
Personal Client Machine Edition
version 5.2.3.8
When you delete a file stored on a network location or mapped network drive that the file is permanently deleted. It does not go to the local computer's recycle bin and does not go to the server's recycle bin.
How to enable a recycle bin for shared folders on a network ? There is the proper solution of restoring and securing your information even after deleting it - The Network Recycle Bin Tool allows you to recover deleted files.
Once you have this tool in your system, it will automatically keep a track of all the network deleted files and you can easily recover them. Instead of removing the files, this tool sends them directly to its predefined recycle bin folder.
There are various options to tune it up. For example: you can set size limits for files stored in the Network Recycle Bin, you can define the list of network drives or network folders to track deleted files.
Additionaly it offers you the Protect Files tool which prevents deletion of network files for specified folders according the file mask. Export and import functions help you to install software with same options on network machines. The password control disallows unauthorized access.
In the long run, losing your important network files and information accidentally is not an issue these days. Instead of getting anxious and worried, feel free to download network recycle bin tool from any reliable source and make sure that you have pre-installed this recovery tool.
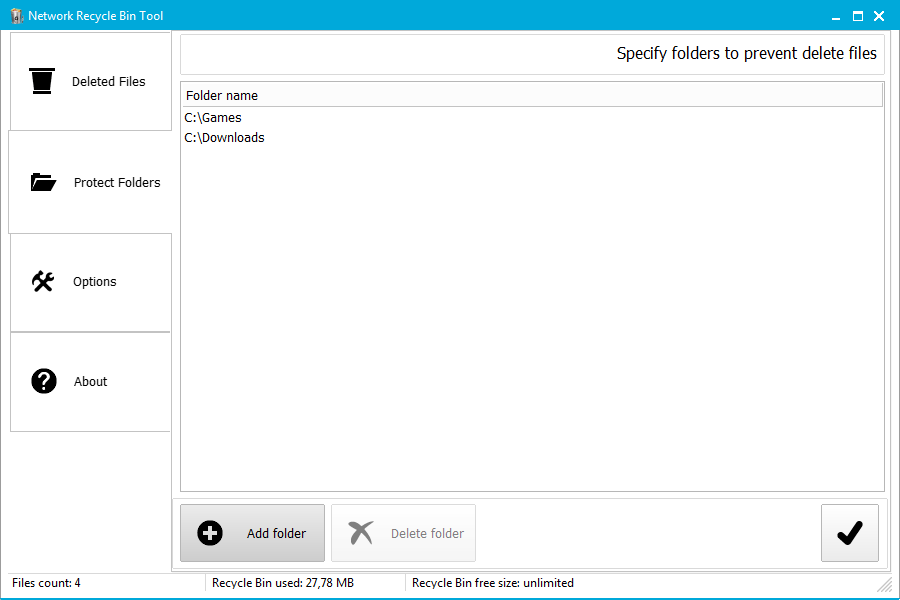
Network Recycle Bin Tool 使用方法
使用方法非常简单,安装好 Network Recycle Bin Tool 只需要 4 步即可,其它需求可以自定义 Options
- 选择
Protect Folders添加你需要保护的的映射网络驱动器 - 在
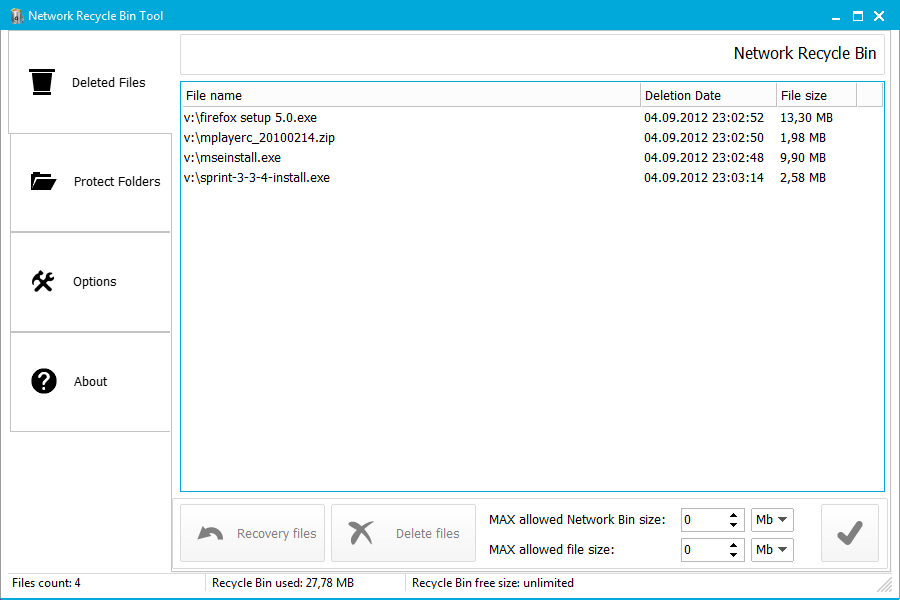
Options中确认删除文件的存储路径,默认可以不修改 - 在映射网络驱动器中尝试删除测试文件,在
Deleted Files可以看到删除的文件 - 可以批量选中要恢复或者删除的文件点击
Recovery Files或者Delete Files

 |
1
wampyl 2018-04-20 11:18:52 +08:00
学到了。貌似碰见同事
|
